


Kiri- Setting up Sims2 - Step 07
Feb 19, 2010 2:05:23 GMT
Post by Kiri on Feb 19, 2010 2:05:23 GMT
Step 07 Putting in the hacks, default replacements, and enabling them.
This is the first time we're actually going to the game in our 'My Documents' folder!
When we installed our game, it automatically generated our neighbourhoods - full of nasty looking NPC's and that's what is currently sitting in this folder.
Don't worry! They'll all be going - but we have a bit of cosmetic work to do first!
All of this work is now done in the 'My Documents' version of the folder. We're finished with the 'Program Files' folder. Yay!
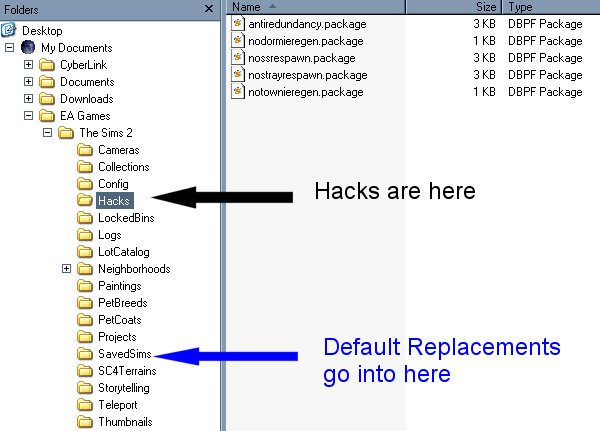
1. Add all the hacks that we downloaded from Step 01.
I put them in a folder called 'Hacks' immediately in 'The Sims 2' folder.
These are the hacks you should have in that folder:
2. Put all your default replacements in your 'Saved Sims' folder.
There are many default replacements you can get -
These are the ones from here:
Airelda provided eyes, faces, skins and townie names.
Pink has default maternity wear
Kiri has default easel paintings.
I also have default eyebrows, some EA clothing recategorised as maxis outerwear, pet eyes, plates (from my site), and other little things - all can be gotten from MTS2.
I put them in 'Saved Sims' because they are picked up from there, but I suspect that they would be picked up from other places too.
3. Start up the game
You are starting up the game and going into any of the neighbourhoods but NOT opening up a lot.
The first thing that will happen after EA Logo, and the opening movie (Which we can also get rid of by the way - but I'll tell you about that later), is you'll get a message
'We have discovered customized or modified content is disabled in your game'.
Then there's some blah, blah, and down the bottom is two boxes:
Disable Custom Content
Enable Custom Content
Select 'Enable Custom Content'.
OK. Then once the game has finally gotten in - after doing all it's spline reticulating etc - pick a hood, any hood and go in.
After it's finished loading, click on the ellipsis on the menu bar (...), then the cog, and then fill in the details as specified on the picture below.
We want to be able to select custom content from the buy and build menu.
We don't want the dialog to ask us to enable custom content to come up every time (just the once is enough).
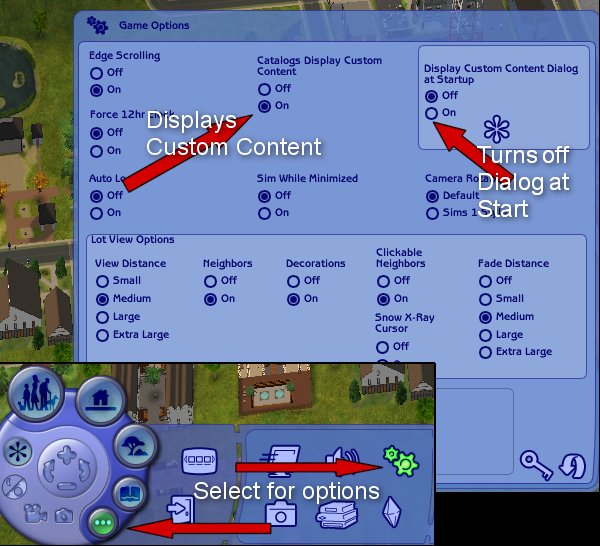
If you didn't get the initial dialog - it's ok, click on the asterisk, and it will come up - then fill it in as below.

So NOW We have custom content enabled in our game and all the things we need to make the default sims beautiful and less numerous!
And one more thing - if you look in your 'The Sims 2' folder you'll see 1-3 packages:
Accessory.cache
Groups.cache
cigen.package
Save these packages into your Sims2 Installation folder.
They hold your preferences for the game including setting the custom content enabled (i.e. you'll never have to do this step again), and EA only caches with accessories and objects.
This is the first time we're actually going to the game in our 'My Documents' folder!
When we installed our game, it automatically generated our neighbourhoods - full of nasty looking NPC's and that's what is currently sitting in this folder.
Don't worry! They'll all be going - but we have a bit of cosmetic work to do first!
All of this work is now done in the 'My Documents' version of the folder. We're finished with the 'Program Files' folder. Yay!
1. Add all the hacks that we downloaded from Step 01.
I put them in a folder called 'Hacks' immediately in 'The Sims 2' folder.
These are the hacks you should have in that folder:
antiredundancy.package
nodormieregen.package
nossrespawn.package
nostrayrespawn.package
notownieregen.package
2. Put all your default replacements in your 'Saved Sims' folder.
There are many default replacements you can get -
These are the ones from here:
Airelda provided eyes, faces, skins and townie names.
Pink has default maternity wear
Kiri has default easel paintings.
I also have default eyebrows, some EA clothing recategorised as maxis outerwear, pet eyes, plates (from my site), and other little things - all can be gotten from MTS2.
I put them in 'Saved Sims' because they are picked up from there, but I suspect that they would be picked up from other places too.
3. Start up the game
You are starting up the game and going into any of the neighbourhoods but NOT opening up a lot.
The first thing that will happen after EA Logo, and the opening movie (Which we can also get rid of by the way - but I'll tell you about that later), is you'll get a message
'We have discovered customized or modified content is disabled in your game'.
Then there's some blah, blah, and down the bottom is two boxes:
Disable Custom Content
Enable Custom Content
Select 'Enable Custom Content'.
OK. Then once the game has finally gotten in - after doing all it's spline reticulating etc - pick a hood, any hood and go in.
After it's finished loading, click on the ellipsis on the menu bar (...), then the cog, and then fill in the details as specified on the picture below.
We want to be able to select custom content from the buy and build menu.
We don't want the dialog to ask us to enable custom content to come up every time (just the once is enough).
If you didn't get the initial dialog - it's ok, click on the asterisk, and it will come up - then fill it in as below.
So NOW We have custom content enabled in our game and all the things we need to make the default sims beautiful and less numerous!
And one more thing - if you look in your 'The Sims 2' folder you'll see 1-3 packages:
Accessory.cache
Groups.cache
cigen.package
Save these packages into your Sims2 Installation folder.
They hold your preferences for the game including setting the custom content enabled (i.e. you'll never have to do this step again), and EA only caches with accessories and objects.
