


Tutorial - Creating Object Default Replacements
Jun 7, 2012 2:37:52 GMT
Post by Kiri on Jun 7, 2012 2:37:52 GMT
How to Create an Object Default Replacement from Scratch
Tools - Essential:
SimPE - essential
Nvidia DDS Utilities (Link to use = DDS Utilities)
Graphics Editor of choice. My choice is Paint Shop Pro 7, but any graphics program that creates PNG's is good.
Before you start - move all your custom content out of your game, or change your game to a vanilla one. Don't know what I'm talking about? Read this
It will make things go all that much faster. Fast is good.
For this tutorial, we'll be creating Bedding Default Replacements. But it can be used for any object. Skins... that's a bit different. But objects, yes.
Step 1: Open up SimPE, and choose Object Workshop tab
At the bottom of the window are a lot of tabs, choose the one that says "Object Workshop". Then press the Start button.
Wait while everything loads. Twice.
All the Categories come up.
For bedding, lets choose beds because that's what they're connected to. Beds are in the Seating Category, Beds sub-category.
It doesn't actually matter which bed you choose for this. I chose Cheap Eazzzzzzzze, simply because it's a familiar base game bed.
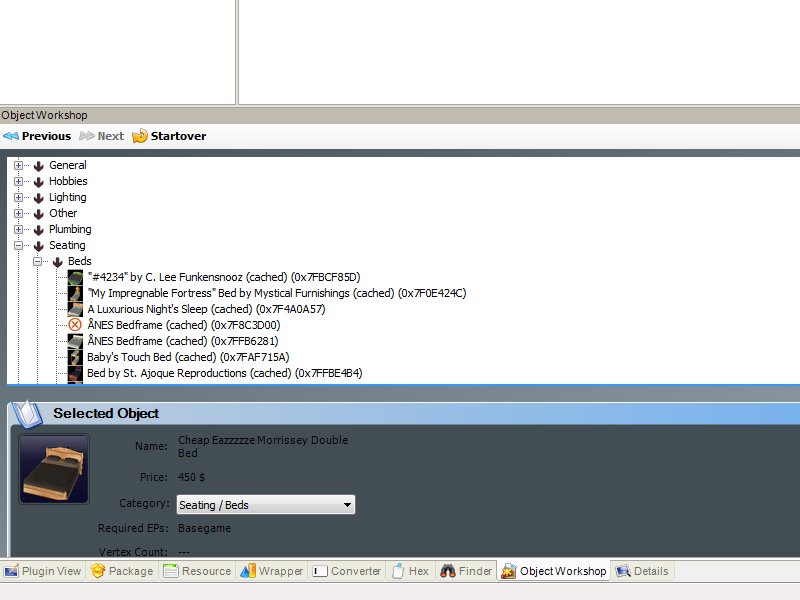
Press Next to get up the choices for the object and the type of action we want to take... what we want to do is choose Clone.
We'll take a quick break here - to explain what all the choices mean, so that it makes sense what choices we make, and why you might need to make different choices depending on what you are making a default of.
So tick and untick the boxes, as per the picture.
And choose either next at the top, or start - both will do the same thing. An object will be created (no name) with the same guid, and content as the original object.
Step 2: Change your View to PluginView and save the object.
Down at the bottom, click the tab that says Plugin view. It'll bring up the values for Object Data Editor. And the Resource tree will list everything in the object - of which we only want the textures. That's including the LIFO - we don't want them either.
Select File on the menu bar, and choose 'Save as...', save your default template. I'm saving it as MASTemplateBedding.
Step 3: Delete all the sections we don't want
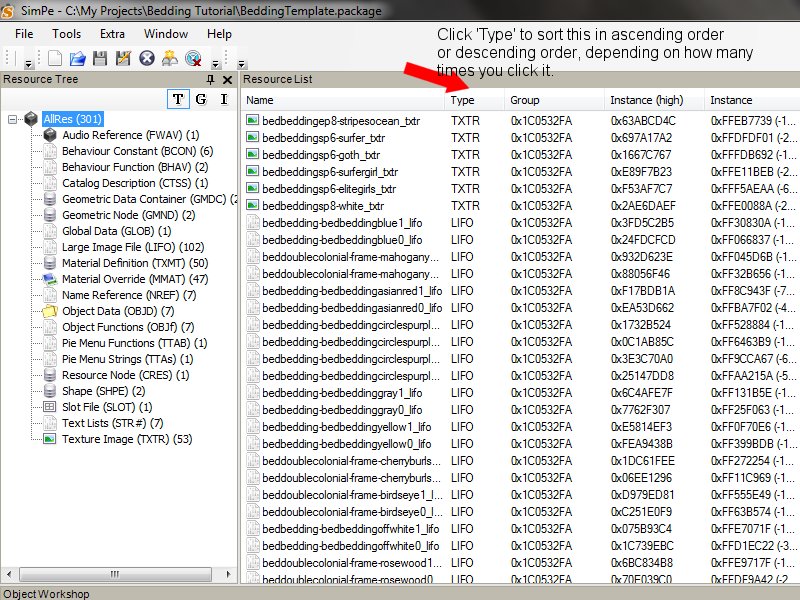
If you click on the 'Type' list in the Resource list Window, you'll get the object sorted by type.
Select all the resources that are not TXTR, and delete them. They'll be crossed out.
When you delete them, you may get an error window up, don't panic - you can ignore it.
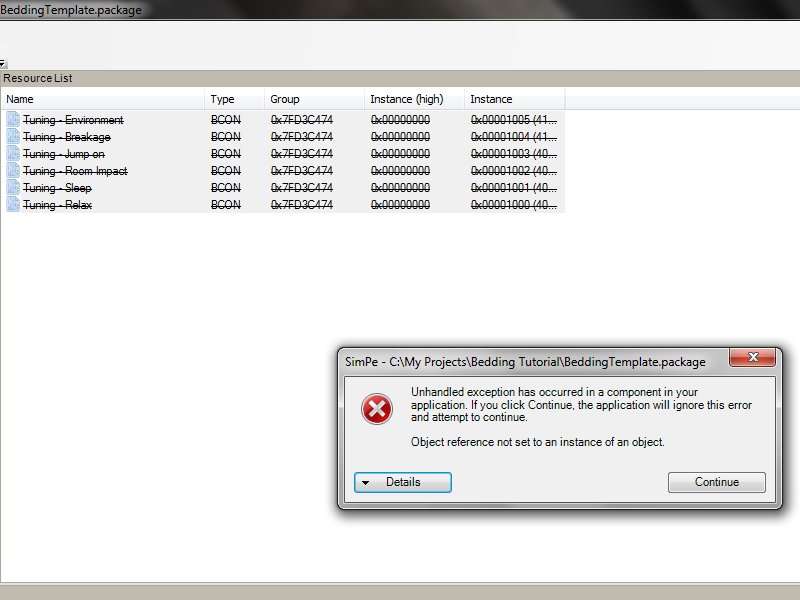
Choose 'Continue' and once it is done, Save the package. When you save the package, the deleted resources will be removed.
Once you deleted all the resources except the TXTR, Sort the resource list by Name, and then delete the non-bedding textures. Save it again.
All you have now is the textures for the beddings. These have the same ID as the original, so at this point you can just replace the textures with what you like.
Step 4: Replacing the textures.
You'll notice with the bedding that have 43 textures. This is 41 beddings, and 2 bump-maps. The bump-maps are for base game beddings, so you'll want to grey them out.
For the others, you will want to replace them with your chosen textures.
The textures in the file go up to a size 256x128, and the usual bedding texture size is 1024x512. This is OK.
Use the 'build dxt' option on each texture, and import the bedding image at 1024x512. What will occur is that the texture will change so that it includes all the MipMaps from the smallest 1x1, to the largest 1024x512.
Once you've done that - commit and save.
Repeat for each bedding. And you're done.
Step 5: (Optional) Split into separate packages.
The easiest way to split into separate packages, is to make 41 copies of your package, and then delete the textures in each package, so that they have 1 unique texture (or in the case of the beddings with bump-maps - 2 textures).
As far as I can see, this should work with any Texture-only, or indeed any-other combination of default replacements for maxis objects.
Go forth and Default!!
Tools - Essential:
SimPE - essential
Nvidia DDS Utilities (Link to use = DDS Utilities)
Graphics Editor of choice. My choice is Paint Shop Pro 7, but any graphics program that creates PNG's is good.
Before you start - move all your custom content out of your game, or change your game to a vanilla one. Don't know what I'm talking about? Read this
It will make things go all that much faster. Fast is good.
For this tutorial, we'll be creating Bedding Default Replacements. But it can be used for any object. Skins... that's a bit different. But objects, yes.
Step 1: Open up SimPE, and choose Object Workshop tab
At the bottom of the window are a lot of tabs, choose the one that says "Object Workshop". Then press the Start button.
Wait while everything loads. Twice.
All the Categories come up.
For bedding, lets choose beds because that's what they're connected to. Beds are in the Seating Category, Beds sub-category.
It doesn't actually matter which bed you choose for this. I chose Cheap Eazzzzzzzze, simply because it's a familiar base game bed.
Press Next to get up the choices for the object and the type of action we want to take... what we want to do is choose Clone.
We'll take a quick break here - to explain what all the choices mean, so that it makes sense what choices we make, and why you might need to make different choices depending on what you are making a default of.
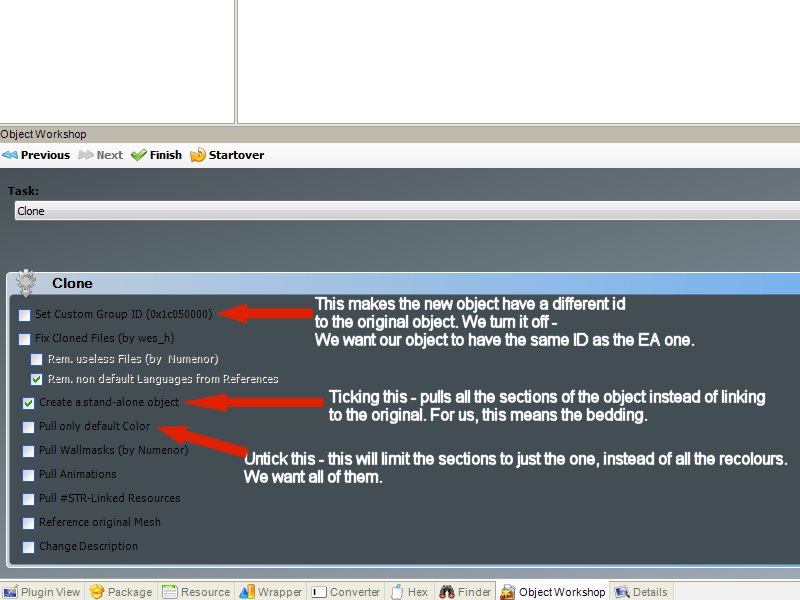
- Set Custom Group. If this one is ticked, it creates a separate object from the original. When creating a default replacement, untick this one. Any object that is created from this will have the same ID as the original and therefore replace it.
- Fix Cloned Files (by WesH). This one removes useless files, useless languages, and other such things. This one doesn't actually matter whether it's ticked or not because we're going to be deleting a lot of the resources we're not using.
- Create a stand-alone object. If this is unticked, then the new object will reference the old resources for it. e.g. Glass for the Window, Bedding for the Bed. If this is Ticked, it will pull the resource.
- Pull only Default Color. If this is ticked, it will pull only one colour sets. So Untick it to get all the sets.
- Pull Wallmasks. If this is ticked, it will pull the wallmasks. These are used when you are changing Windows and Doors. If you are changing the shapes of the build items, you pull them, if you aren't (and we aren't with bedding) untick the option.
- Pull Animations. If this is ticked, it will pull the animations. These are used for objects that have animations linked to them - bookcases, sofas, etc. Untick it, if you are not needing the animations.
- Pull #STR-Linked Resources. Untick this depending on whether you are changing the String resources or not.
- Reference Original Mesh. If this is ticked, the Original mesh is referenced, rather than bringing the mesh with the new object. We have it unticked, it doesn't matter - we're deleting the mesh anyway.
- Change Description. Untick this one as well. The change description is for new objects.
So tick and untick the boxes, as per the picture.
And choose either next at the top, or start - both will do the same thing. An object will be created (no name) with the same guid, and content as the original object.
Step 2: Change your View to PluginView and save the object.
Down at the bottom, click the tab that says Plugin view. It'll bring up the values for Object Data Editor. And the Resource tree will list everything in the object - of which we only want the textures. That's including the LIFO - we don't want them either.
Select File on the menu bar, and choose 'Save as...', save your default template. I'm saving it as MASTemplateBedding.
Step 3: Delete all the sections we don't want
If you click on the 'Type' list in the Resource list Window, you'll get the object sorted by type.
Select all the resources that are not TXTR, and delete them. They'll be crossed out.
When you delete them, you may get an error window up, don't panic - you can ignore it.
Choose 'Continue' and once it is done, Save the package. When you save the package, the deleted resources will be removed.
Once you deleted all the resources except the TXTR, Sort the resource list by Name, and then delete the non-bedding textures. Save it again.
All you have now is the textures for the beddings. These have the same ID as the original, so at this point you can just replace the textures with what you like.
Step 4: Replacing the textures.
You'll notice with the bedding that have 43 textures. This is 41 beddings, and 2 bump-maps. The bump-maps are for base game beddings, so you'll want to grey them out.
For the others, you will want to replace them with your chosen textures.
The textures in the file go up to a size 256x128, and the usual bedding texture size is 1024x512. This is OK.
Use the 'build dxt' option on each texture, and import the bedding image at 1024x512. What will occur is that the texture will change so that it includes all the MipMaps from the smallest 1x1, to the largest 1024x512.
Once you've done that - commit and save.
Repeat for each bedding. And you're done.
Step 5: (Optional) Split into separate packages.
The easiest way to split into separate packages, is to make 41 copies of your package, and then delete the textures in each package, so that they have 1 unique texture (or in the case of the beddings with bump-maps - 2 textures).
As far as I can see, this should work with any Texture-only, or indeed any-other combination of default replacements for maxis objects.
Go forth and Default!!
