Fia - Blinkie Tutorial
May 29, 2008 20:43:02 GMT
Post by Administrator on May 29, 2008 20:43:02 GMT
Originally posted by Fia
What you need:
* a graphics program
* an animation program
* basic knowledge in how to use them (how to pick colors, add layers and so on)
I'm using Psp 7 and Animation Shop 3 but I'm sure you can adapt this tutorial to other programs as well.
This is the kind of blinkie we're going to create:

To make the graphics needed:
(you need your graphics program for this part)
* The most common size for these blinkies are 150x20 pixels. We're going to need a 3 pixel wide border around the blinkie so create a new picture that's 144x14 pixel, leaving room for the border.

* Make sure it's got the color you want for the background. Perhaps you want to make the background a bit fancy too, by using gradient colors or maybe a pattern, but this time a plain yellow background will do.
* Pick the color you want for your border as the background color (dark blue in my case)

Then add the actual border (you'll find it under Image - Add borders in Psp 7). Make it symmetric and 3 pixel wide.

* Next step is to create a new layer. I've named it "dotted line1" since this is where we will paint the first dotted line needed for the blinking effect.
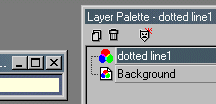
* I've chosen light blue as my first color, using the color scheme of the forum. Zoom in the picture so you can see things better and make each dot 2 pixels wide and the space between the also two pixels wide. Pay attention to how I made the corners. (This will give you the right amount of dots which is important for the next step).

* Now change every other dot to a contrasting color. (This is where it's important to have the right amount of dots so you don't end up with two dots of the same color next to each other in the end) Since I used such a light, almost white blue, I will now use a darker blue. If you started out with a dark color, pick a lighter one this time).

* Then copy the line from the first layer and paste it to a new layer called "dotted line2".
* This time I change all the light blue colors to darker blue and the dark ones to light. The replacer brush will be very helpful.
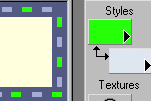
- First I change the light blue dots temporary to green (If I changed them to dark blue right away I would end up with all dots of the same color again)
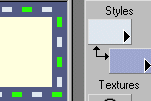
- Then I replace the dark blue color with light blue
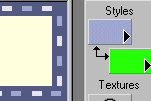
- And finally I change the ugly green dots to dark blue.
If this doesn't make sense, just do it your own way. The important thing is that the two colors change place since that is what creates the animation.
* Now we're getting to the fun part. Add a new layer called "text" and chose what you want to say with your blinkie and what font and color to use.
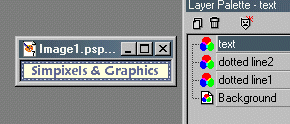
* If you want to now is the time to be creative and add other decorations to your blinkie, images, shadows and so on. I've decided to leave this one plain and simple though.
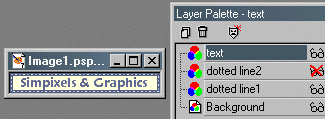
* Time to finish up and actually create the images you need for the animation. First I make the layer "dotted line2" invisible (In Psp 7 you do this by clicking o the small "glasses" you see beside each layer), then I chose "edit" (from the menu) and "copy merged". That will copy all visible layers at the same time. I then paste it as a new image and save that image as blinkie1.gif (Animation shop can read both psp files as well as jpgs and gifs, but some animation programs can only read gif-files and Psp 8 user have to use gifs too, so we're sticking to the safest format here).
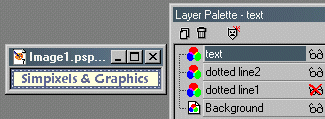
* Then make "dotted line1" invisible (and "dotted line2" visible) and do the same procedure all over again, edit-copy merged and paste as a new image. I save this one as blinkie2.gif.
* That's it! Now you're done in your graphics program and can start up the animation program instead.
To make the animation:
I'm going to guide you through the process in Animation Shop3. Hopefully you will be able to figure out how to do in an another program too.
* The easy way to make an animation is to use the animation wizard. If it doesn't start as soon as you open the program (mine doesn't) you'll find it in the menu under "file".
* On the first window in the wizard make sure "same size as the first image" is checked. Then check "transparent" in the next window. It doesn't matter for this blinkie but it's important if you want to make an animation with transparent background (say a blinkie with a "pokie up" or a smile) so it's a good thing to learn to always use it. (For the third window I have "upper left corner" and "with the canvas color" checked. But that window really doesn't matter for this animation so feel free to ignore it.)
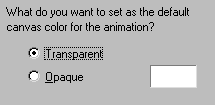
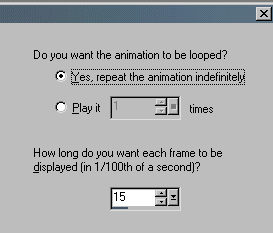
* The fourth window lets you decide if the animation should repeat it self (which a blinkie should) or if it should stop. The other option in this window is really important since it sets the time each frame should be displayed and the speed of the animation. Something between 10 and 15 is probably the best for a blinkie. I'll use 15 for this one (you can change it afterwards if you want to)
* The next window will let you add the pictures used for the animation. Click on the add-button and choose to add blinkie1.gif, then add blinkie2.gif (you have to remember yourself where you saved them) It's always best to add them one at the time since the program sometimes messes up the order of the pictures if you add them all at once and the order is very important when you create animations.
* Hit next again and then finish it.
*This is what the animation will look like now.
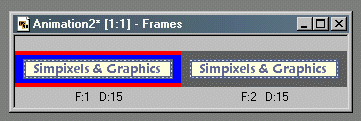
F stands for frame and D for display time. (The number you picked in the wizard) If you want to change the number just rightclick on the frame and chose "frameproperties". (The blue frame is the selected one)
* Now for the best part! Go to the menu and hit "view - animation" and you should be able to see your new creation. :D I hope you'll like it!
* Finally it's time to save the animation. After you've picked the name you will get a couple of different optimizing options. I usually go for the highest quality but you have to experiment with what you like best. The better quality the bigger image. You will be taken to an optimization preview (where you can see if the image loses any quality depending on your choice) and to an optimization result window that lets you know how big the image will be and how long time it will take to load. You can go back and forth and test all the alternatives if you want to.
* This is MY final result, now hurry to the Graphics Galore forum and show me yours.

Fia!
What you need:
* a graphics program
* an animation program
* basic knowledge in how to use them (how to pick colors, add layers and so on)
I'm using Psp 7 and Animation Shop 3 but I'm sure you can adapt this tutorial to other programs as well.
This is the kind of blinkie we're going to create:

To make the graphics needed:
(you need your graphics program for this part)
* The most common size for these blinkies are 150x20 pixels. We're going to need a 3 pixel wide border around the blinkie so create a new picture that's 144x14 pixel, leaving room for the border.

* Make sure it's got the color you want for the background. Perhaps you want to make the background a bit fancy too, by using gradient colors or maybe a pattern, but this time a plain yellow background will do.
* Pick the color you want for your border as the background color (dark blue in my case)

Then add the actual border (you'll find it under Image - Add borders in Psp 7). Make it symmetric and 3 pixel wide.

* Next step is to create a new layer. I've named it "dotted line1" since this is where we will paint the first dotted line needed for the blinking effect.

* I've chosen light blue as my first color, using the color scheme of the forum. Zoom in the picture so you can see things better and make each dot 2 pixels wide and the space between the also two pixels wide. Pay attention to how I made the corners. (This will give you the right amount of dots which is important for the next step).

* Now change every other dot to a contrasting color. (This is where it's important to have the right amount of dots so you don't end up with two dots of the same color next to each other in the end) Since I used such a light, almost white blue, I will now use a darker blue. If you started out with a dark color, pick a lighter one this time).

* Then copy the line from the first layer and paste it to a new layer called "dotted line2".
* This time I change all the light blue colors to darker blue and the dark ones to light. The replacer brush will be very helpful.

- First I change the light blue dots temporary to green (If I changed them to dark blue right away I would end up with all dots of the same color again)

- Then I replace the dark blue color with light blue

- And finally I change the ugly green dots to dark blue.
If this doesn't make sense, just do it your own way. The important thing is that the two colors change place since that is what creates the animation.
* Now we're getting to the fun part. Add a new layer called "text" and chose what you want to say with your blinkie and what font and color to use.

* If you want to now is the time to be creative and add other decorations to your blinkie, images, shadows and so on. I've decided to leave this one plain and simple though.
* Time to finish up and actually create the images you need for the animation. First I make the layer "dotted line2" invisible (In Psp 7 you do this by clicking o the small "glasses" you see beside each layer), then I chose "edit" (from the menu) and "copy merged". That will copy all visible layers at the same time. I then paste it as a new image and save that image as blinkie1.gif (Animation shop can read both psp files as well as jpgs and gifs, but some animation programs can only read gif-files and Psp 8 user have to use gifs too, so we're sticking to the safest format here).

* Then make "dotted line1" invisible (and "dotted line2" visible) and do the same procedure all over again, edit-copy merged and paste as a new image. I save this one as blinkie2.gif.

* That's it! Now you're done in your graphics program and can start up the animation program instead.
To make the animation:
I'm going to guide you through the process in Animation Shop3. Hopefully you will be able to figure out how to do in an another program too.
* The easy way to make an animation is to use the animation wizard. If it doesn't start as soon as you open the program (mine doesn't) you'll find it in the menu under "file".
* On the first window in the wizard make sure "same size as the first image" is checked. Then check "transparent" in the next window. It doesn't matter for this blinkie but it's important if you want to make an animation with transparent background (say a blinkie with a "pokie up" or a smile) so it's a good thing to learn to always use it. (For the third window I have "upper left corner" and "with the canvas color" checked. But that window really doesn't matter for this animation so feel free to ignore it.)

* The fourth window lets you decide if the animation should repeat it self (which a blinkie should) or if it should stop. The other option in this window is really important since it sets the time each frame should be displayed and the speed of the animation. Something between 10 and 15 is probably the best for a blinkie. I'll use 15 for this one (you can change it afterwards if you want to)

* The next window will let you add the pictures used for the animation. Click on the add-button and choose to add blinkie1.gif, then add blinkie2.gif (you have to remember yourself where you saved them) It's always best to add them one at the time since the program sometimes messes up the order of the pictures if you add them all at once and the order is very important when you create animations.
* Hit next again and then finish it.
*This is what the animation will look like now.

F stands for frame and D for display time. (The number you picked in the wizard) If you want to change the number just rightclick on the frame and chose "frameproperties". (The blue frame is the selected one)
* Now for the best part! Go to the menu and hit "view - animation" and you should be able to see your new creation. :D I hope you'll like it!
* Finally it's time to save the animation. After you've picked the name you will get a couple of different optimizing options. I usually go for the highest quality but you have to experiment with what you like best. The better quality the bigger image. You will be taken to an optimization preview (where you can see if the image loses any quality depending on your choice) and to an optimization result window that lets you know how big the image will be and how long time it will take to load. You can go back and forth and test all the alternatives if you want to.
* This is MY final result, now hurry to the Graphics Galore forum and show me yours.

Fia!


